Saturday, May 15, 2010

Wickersham Update

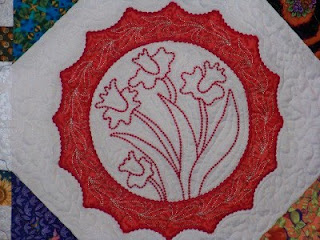
It's been a while since I've posted about the Wickersham quilt. It hasn't been set aside. I've just been busy re-working the blocks......and pictured is the end result.   The entire first row is now finished, stitched out, and waiting to become part of the quilt......once the other ten rows are done, that is. 

While the first two blocks I stitched out turned out lovely, they just didn't seem to have enough background space around them. They looked a bit squished into the background space. So I opted to make my blocks a bit smaller....which meant re-stitching. As I learned new digitizing techniques, I applied these to the blocks I had already done.....which I think just adds even more to the blocks.  At first I wasn't real happy with the idea of having to go back in and re-work all the blocks that I had already digitized (3 rows worth!). Now......now I'm happy that I'm taking the time to re-work the blocks. I'm using a really neat feature of my embroidery program that allows you to do a "virtual" stitch-out. By using this feature I'm able to see all those tiny little mistakes before any thread touches  fabric. I'm able to go back in and fix all these little flaws. While it may be time-consuming, it does save on fabric and thread. Plus it makes me happier. Usually, the first time the block is stitched out is the keeper. For me, there is nothing more frustrating than having to stitch out a block mulitiple times. I won't even get into the fabric/thread that is wasted......or the time spent.

I've started re-working row 2. It's going well, albeit slowly. I hope to start stitching out row 2 blocks in a few days. I'm really loving the way this quilt is looking so far. I can't wait to see it all put together.  I've been wanting to make this quilt for years. Now it's finally happening......and using a technique that I never thought I would even think about learning, let alone using.


Monday, May 10, 2010

Painted Plates

Here is my latest finished quilt. This had started out as a block of the month......but, then the shop closed. Those of us who had signed up had the option of continuing with it and picking up our monthly blocks at a different location.....which was really nice. Unfortunately, the different location was just too much of a drive for me (an hour and a half one way). So I opted to finish my quilt with what I had.

My completed quilt measures 61" square. It has 3 borders.....thin inner border, checkerboard border, and a darker outer border.......and is finished with a dark red binding. The "plates" were digitized (not by me) and stitched out on an embroidery machine. This was the first machine embroidery/applique quilt that I have ever done.....and it was what drew me to this quilt in the first place. It gave me a chance to play with the embroidery side of my machine.....which I really enjoyed doing. Of course these days I digitize my own designs......but this was a start for me.

The label was designed in my embroidery software and then stitched out on my machine. I did something a bit different with it. Instead of sewing it on by hand....which I normally do.....I opted to quilt the label in place. It acutally worked out much better than I thought it would. I had ironed the raw edges to the back of the label and then glued it where I wanted it on the back of the quilt. I used a washable glue stick for this. I checked often while doing the machine quilting in this area because I thought for sure that the label would want to curl up or shift.....or something would happen to where I would have to take out all the stitching and start all over. Seems l worried for nothing. The label stayed right where I wanted it. Nothing moved. Nothing flipped up and over. It stayed nice and flat....thankfully. Will I be attaching my labels like this with future quilts? Most likely yes.  :>) It worked that well.

Friday, May 7, 2010

Spinning Update

It's been a while since I've done a spinning update. Life has slowed down a bit now that shearing (sheep only) is finished. I still have a few fleeces that need to be skirted and gone over.....but that will have to wait until better weather. We are still getting frost!!

Pictured is one of my latest hand-spun skeins. This is a blend of Shetland/red llama/soy silk. It spun up to be about a worsted weight yarn. The Shetland is from my horned ewe, Willow. It is actually her britch skirtings from one year. The britch skirtings were so clean that I just couldn't bear to toss it.....and since her fleece was sold (as it is every year) it allowed me to enjoy a little bit of her lovely fiber. I chose to blend it with some red llama (to bring out the red in Willow's natural color....moorit) and blended in a bit of soy silk for added strength (wasn't sure what I was going to do with the finished yarn). The end result was a lovely brown yarn that, while not the softest, isn't itchy either. I love the various shades within the yarn and am thinking it will make up into a beautiful knitted/fulled teddy bear. A jointed one.....just for me. 

This isn't the only spinning I've done lately. I have decided that I would like to make a couple of knitted/fulled rugs and have started spinning for that. I'm using mill end roving that I purchased from The Sheep Shed Studio quite some time ago. It's a wool/mohair blend so it should make wonderful rugs that wear well. I've already spun up a pound of brown/black/white roving into a bulky weight yarn. And I finished plying a pound of black/gray/white singles. This, too, ended up being a bulky weight yarn. I just need to set the twist on it. Currently on the wheel is a white/gray/black roving. I have a pound of this as well. The finished yarn will be paired with the black/gray/white yarn since it will be much lighter in color (more white than black.....whereas the already finished yarn is more black than white). As for the brown/black/white yarn.....I have a pound of light brown/white roving that I will eventually spin up into a bulky weight yarn which will be paired with it. I will be sure to take pictures of the finished yarn. I know it probably sounds a bit confusing right now with the various colors of the different rovings I'm working with.   

I'm using my Ashford Country Spinner to spin all this up. With its large bobbin (2 lb. capacity) I'm able to spin the entire pound into singles at one time (and ply it, too). I end up with one very large skein.....which makes me happy.  No worrying about wondering if I have all the skeins together. I have a two yard niddy noddy that I wind the plyed yarn on for setting the twist......and a jumbo ball winder for when I'm ready to use these large skeins.